Compensation grids are where you finally combine levels with reference points and add the financial values. The financial values you enter here are what will control how much workers get paid (although there’s one setting in fixed compensation plans that allows you to override this, but we’ll get to that later).
Because we’re entering actual numbers here, we have to select a currency for each compensation grid. Compensation grids are legal entity specific, but you can still pay people in multiple currencies within the same legal entity, which is why you can set up compensation grids in different currencies. If this is the case for you though, be wary. When we set up the actual fixed compensation plans we will pick which compensation grid should apply – but this list isn’t filtered based on the currency selected against the plan. If you have multiple grids in a single LE accommodating multiple currencies, I recommend you include the currency in the name or description to give you a better chance of picking the right one.
Compensation grids are set up under Compensation management > Links > Fixed compensation > Compensation grids.
First of all, we need to create a name for the grid itself, indicate which type of grid it is (step/grade/band – which limits to type of plan it can later be applied to), which reference setup will be used (also linked to the type of grid – grade/step/band) and give some effective dates. Most of this stuff should be pretty self explanatory by now – here’s what the form looks like when I create the LMG pay scale example:
When that’s all in, hit save, and the ‘compensation structure’ button will become available.
Brace yourself – this is where you finally get to create your pay tables and add financial values.
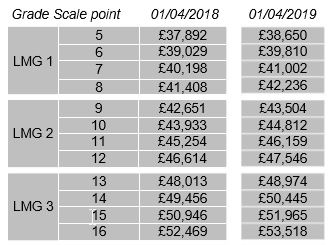
For each level, we’re now going to enter the reference points. In my LMG example it’s the various spine points for each grade, if you’re entering a band or grade plan and chose the appropriate reference setup, it’ll be the min/max values and any control points you’ve entered.
By the time you’ve finished (and be alert, you’re working with 4 decimal places, and all the zeros can get confusing) you’ll have taken this:
…and turned it into this:
So the values are in and we’re almost ready to create the plans that will be assigned to employees. Before we do that though there are a few more pieces of setup that we need to do, starting with pay rate conversions.


Hi Tom,
Your blog on setting up compensation in Talent has been invaluable, thanks. One question: you give the example of setting up a Step compensation grid using four scale points per grade and you said that you would come back to how to set up a grid where not every grade has the same number of scale points. I have exactly this situation to set up but I can’t find any explanation on how this can be accommodated in your blog. Any help on this would be gratefully received!
Thanks
Hi Gary – sorry for the delayed response! If you want to be able to use compensation processes to run increments, your best bet is to have one plan for each level. It’s a higher maintenance burden but the margin for error is less.