This is a bit that I struggled with when I was first learning it – because it feels like you have to set up your template twice. Once in the system admin part of Core HR, and once when you’re editing your workflow. After a while you just accept it as it is and stop scratching your head over it. It’s a bit weird, but there’s probably a reason why it is this way, so we move on.
In the System Administration links page, there are two template links under the Email section. One for ‘System email templates’, and one for ‘Organisation email templates’. The system ones relate to global messages, the organisation ones relate to legal entity specific messages. (This is much clearer than what they used to be called, where one was called ’email templates’ and one was called ’email messages’, which is a description you might read in other blogs on the subject). For the leave example our messages are legal entity specific, so we jump in to the ‘Organisation email templates’ link.
In this form we’re going to enter information about the email template that the workflow will call when it needs to notify a user. You then specify the details of the actual email message itself within the workflow editor, which we look at in the next step. For some reason when I started reading blog posts on this subject when I was first learning, I got the impression this stage was optional. It’s not. This step and the one following are critical, so don’t skip them.
Ok – let’s take a look at what the fields on this form do:
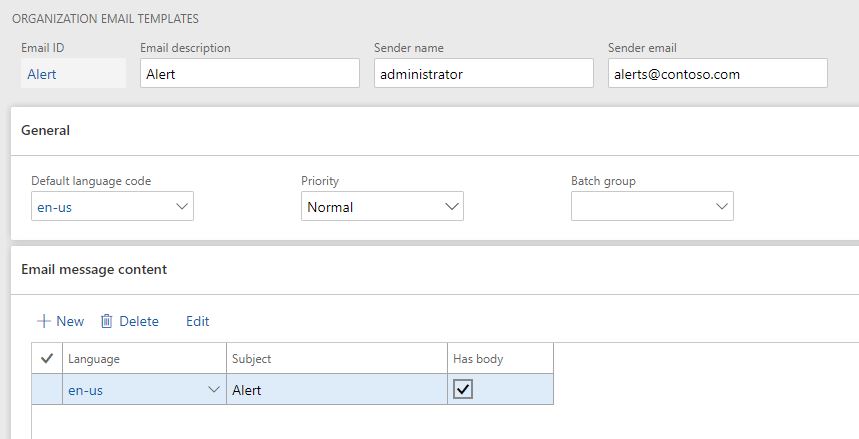
Email ID
This is a unique identifier for the template. Apart from the fact that is has to be unique, and consist of 10 characters or less, you can make this pretty much whatever you like. For ease of recognition though, probably makes sense to make it something contextual relevant to the use of the message.
Email description
When you’re checking the mail sending log (which we’ll look at later), this is the field which shows up in the table. If an email has failed to send, it’s useful to be able to see immediately what the email was, so you know how much of a problem you’ve got.
Sender name/email
This bit’s key. This MUST be a valid email address on your tenant. Most organisations have some kind of system user account which they use to run batch jobs (ask your IT team), in which case it’s easiest to use this. I’ve never managed to get this to work successfully with shared mailboxes, which is a shame, because in some HR contexts that makes more sense than a named user. If you’ve used the SMTP settings (which I never do) I understand that the details here must match the options set up there. Interestingly, the important bit is the email address. It seems like you can set the sender name to say anything you like – it’ll ignore it and use the actual name associated with the email address regardless.
Once emails start sending about these workflows, they’ll show up in the sent items of the email account you’ve selected here. Can be useful if you ever need to check the date something was sent or verify the exact content.
Default language code
Pretty obvious really.
Priority
Sets the priority level on the email. Don’t be that person who marks everything as urgent even when it isn’t.
Batch group
If you want to get really geeky about batch jobs, there are plenty of other blog posts. If, like me, you just want to get those emails going out, you can leave this blank.
Email message content
This sounds more exciting than it is. All you’re really going to do here is tell Talent to drag in the message from the workflow editor when it creates this template. You can get more sophisticated with this when you get more practiced at it – but this will get you up and running. Pick your language, enter the subject line (the same subject line will be used for all the emails which might be triggered by the workflow, including approvals and rejections, so keep it fairly generic) and then hit ‘edit’. Hitting ‘edit’ will bring up a browse to upload pane where you need to upload a HTML file which forms the basis of your message. The HTML file is where you can start to make your emails a bit more interesting, but for the purposes of this post we’re going to keep it really simple. To create your HTML file:
- Open Notepad (for the less techy among us, Notepad is a basic text editor which allows you to create code files without accidentally adding in bits of code you don’t really want. If you try and use Word to do this you’ll probably find you get some unexpected results).
- In the Notepad file, type the following:<html>
<body>
<p>%message%</p>
</body>
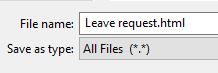
</html> - Save the Notepad file somewhere you can find it again, as a ‘.html’ file as follows (note the file extension ‘.html’ and the file type ‘all files’)
In your browse to upload box you can now select the HTML file you just created and upload if. If successful, you should see something like this:
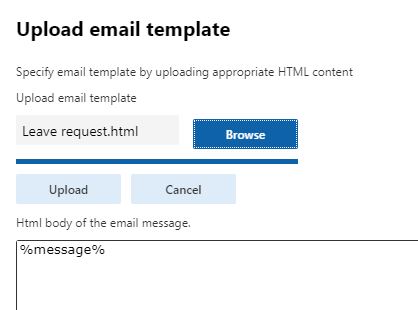
If you don’t see the above, go back to your HTML file and check that you’ve got all the characters that appear in the above.
If you’re pretty handy with a bit of HTML, you can make these email messages a bit more engaging. Once you get things up and running you can always play around a bit and see what you can make work. The above message though will get you started.
1 thought on “How to set up email notifications for leave requests – 3 – Creating your email template”